7 Game-Changing Smoke & Cloud Photoshop Brushes That'll Transform Your Designs Into Atmospheric Masterpieces
Introduction
Let’s be real – creating that dreamy, atmospheric vibe in your designs can feel like trying to catch actual clouds with your bare hands. You’ve probably spent hours trying to paint realistic smoke or clouds from scratch, only to end up with something that looks more like a smudgy accident than a professional masterpiece.
Here’s the thing: you don’t need to be a digital painting wizard to create stunning atmospheric effects. Beautiful smoke and cloud Photoshop brushes are your secret weapon for transforming ordinary designs into captivating visual experiences that stop viewers in their tracks.
Whether you’re working on fantasy landscapes, product photography enhancements, movie posters, or social media graphics, the right brush set can slash your workflow time by up to 70% while delivering professional results that’ll make people wonder how you did it. In fact, according to recent design workflow studies, designers who incorporate specialized brush sets into their toolkit report completing atmospheric effects 3-5 times faster than those using standard tools.
In this comprehensive guide, I’m going to walk you through everything you need to know about smoke and cloud Photoshop brushes – from choosing the perfect set to mastering techniques that’ll elevate your work to the next level. Ready to add some serious atmosphere to your designs? Let’s dive in.
Why Smoke & Cloud Brushes Are Essential for Modern Designers
Before we jump into the nitty-gritty, let’s talk about why these brushes have become non-negotiable in every serious designer’s toolkit.
First off, they save you an incredible amount of time. Instead of painstakingly painting each wisp of smoke or cloud formation from scratch, you can lay down realistic effects in seconds. Moreover, they give you creative flexibility that’s hard to achieve with stock photos alone – you control the opacity, color, blend mode, and placement entirely.
Additionally, smoke and cloud brushes help you create depth and dimension in your work. They’re perfect for adding that mysterious, moody atmosphere to portraits, creating dramatic skies in landscape composites, or building otherworldly scenes for fantasy projects. Plus, they’re incredibly versatile – the same brush that creates ethereal clouds can also generate fog, mist, steam, or magical energy effects.
According to Adobe’s 2024 Creative Trends Report, atmospheric and mood-driven visuals saw a 312% increase in engagement on social platforms compared to flat, straightforward imagery. That’s huge! People are drawn to visuals that evoke emotion and transport them somewhere else.
Understanding Different Types of Smoke & Cloud Brushes
Not all atmospheric brushes are created equal, and understanding the different types will help you choose the right tool for your specific project.
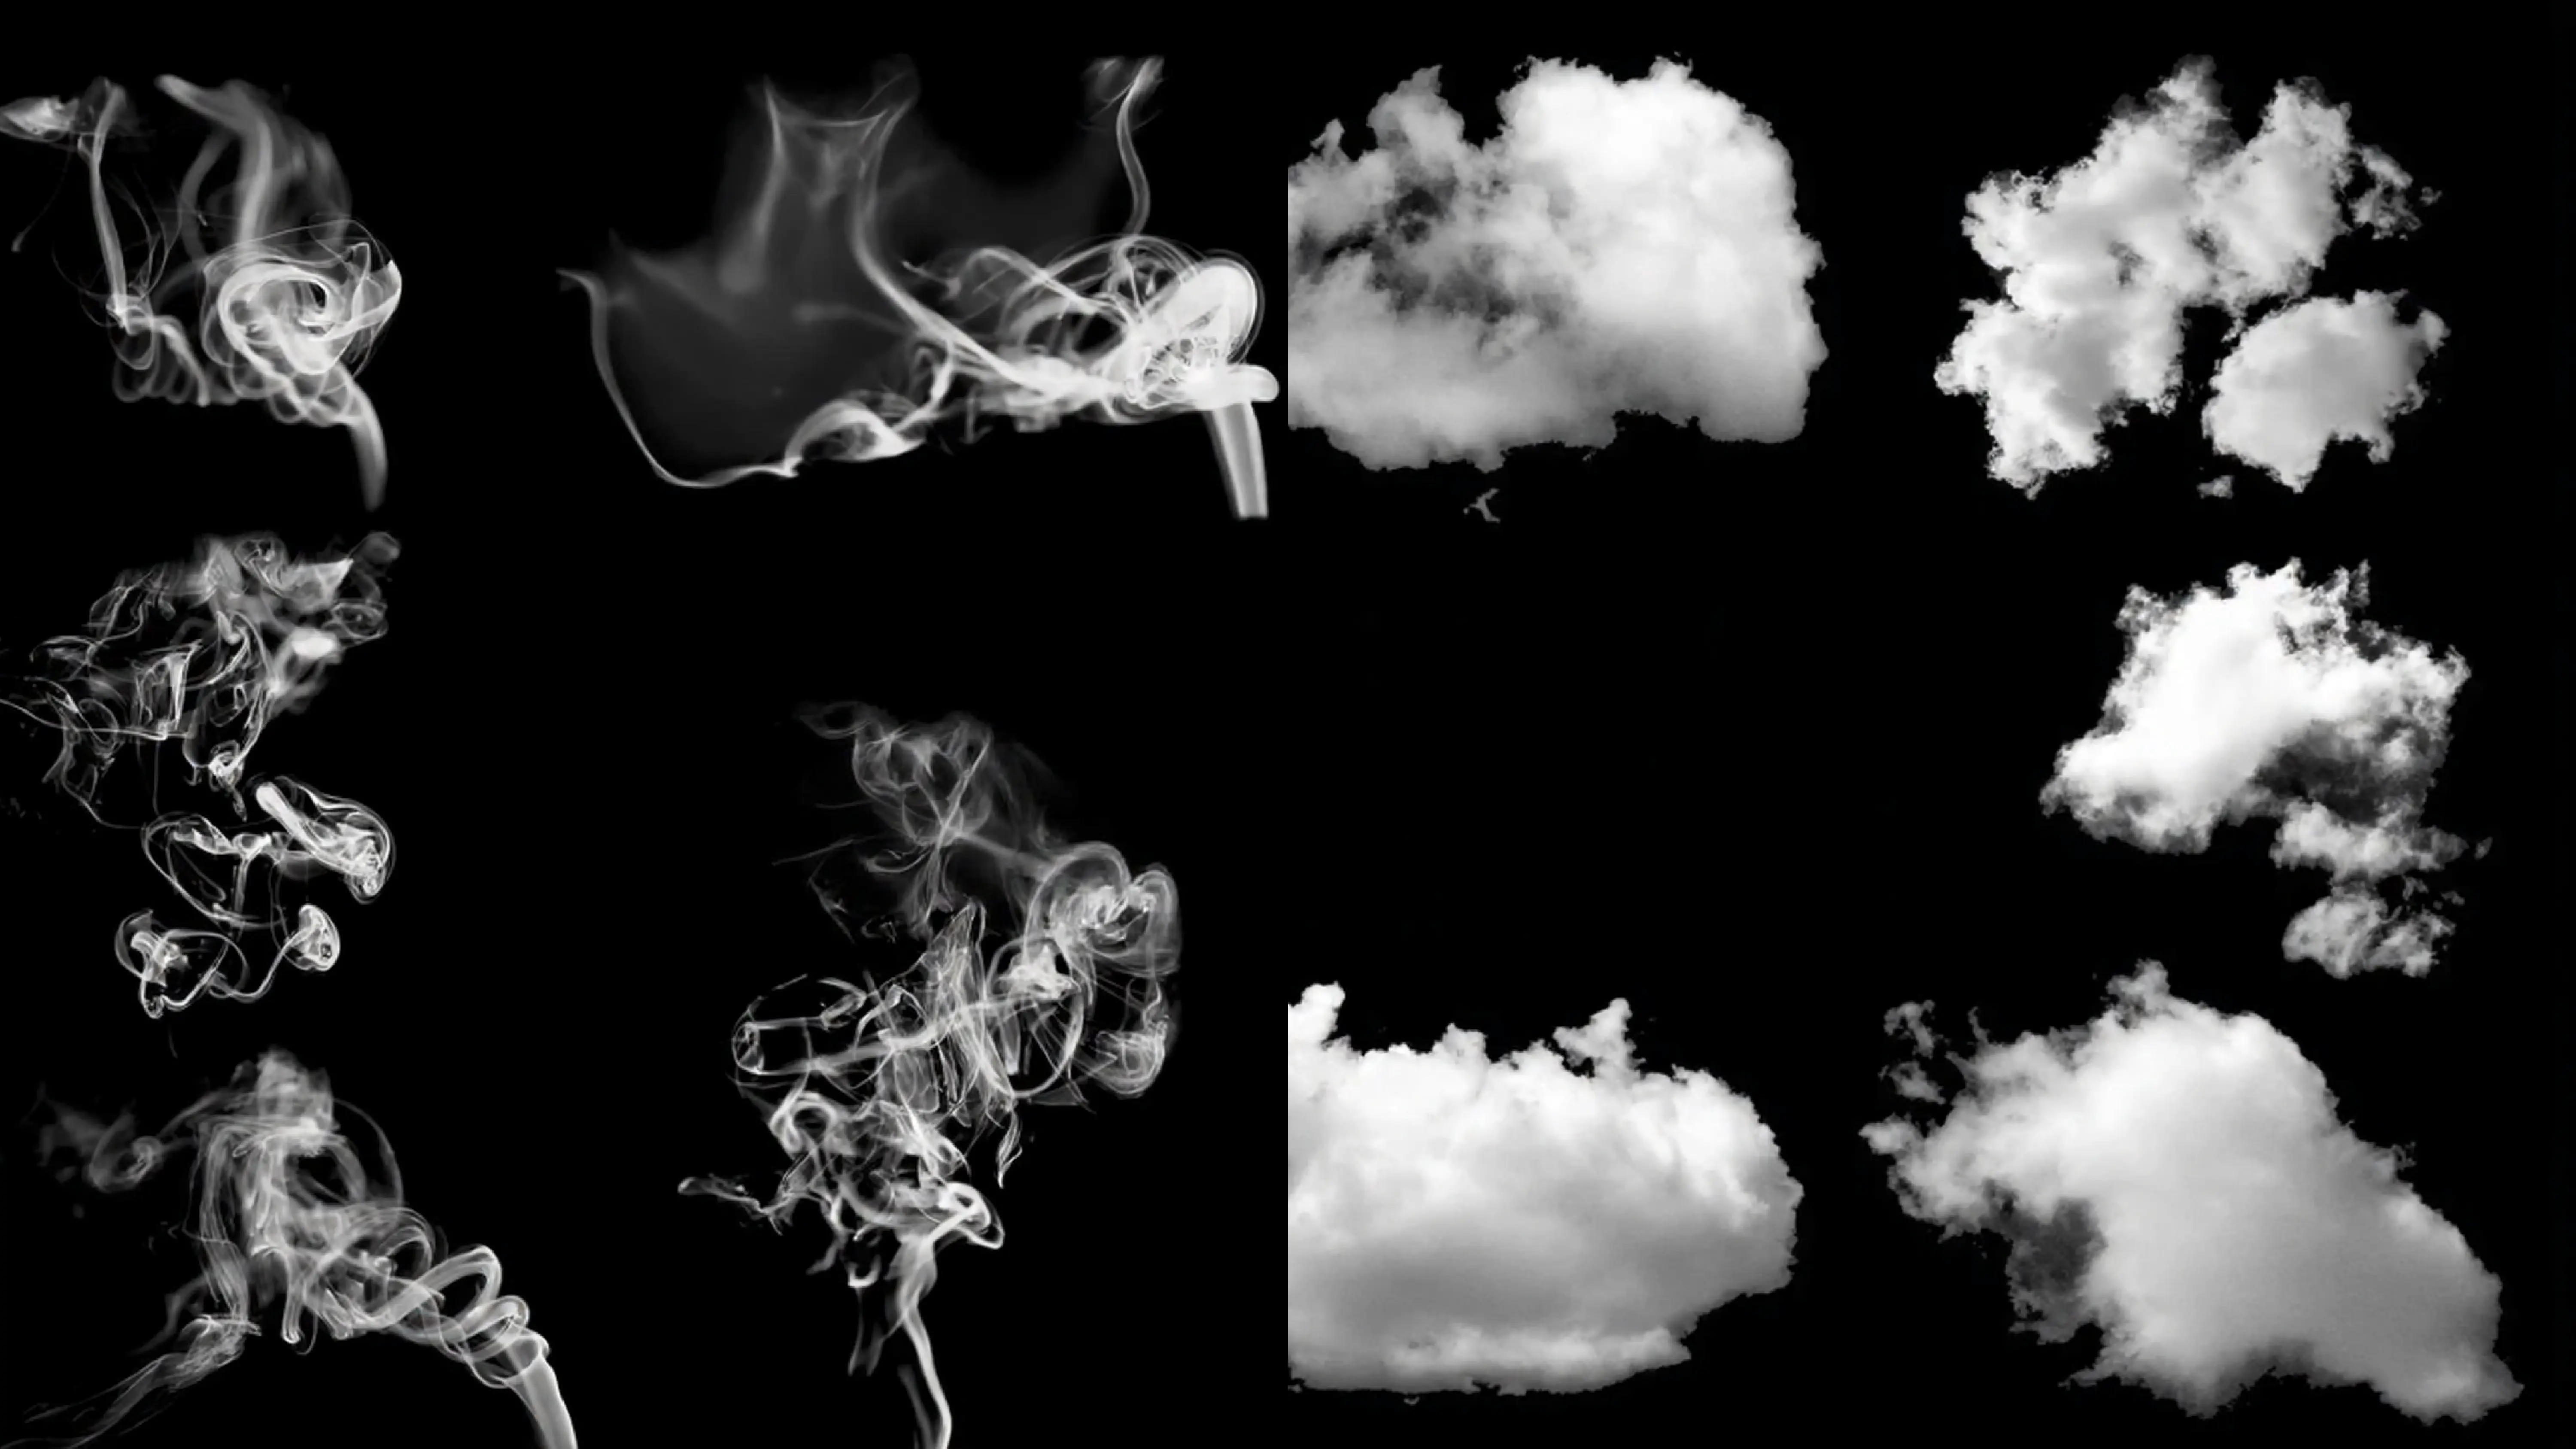
High-Resolution Cloud Brushes are your go-to for creating realistic skies and weather effects. These brushes capture the natural, billowy texture of cumulus, cirrus, and stratocumulus clouds. They typically range from 2500-5000 pixels in size, ensuring crisp details even in large-format prints.
Smoke and Vapor Brushes offer more dynamic, flowing forms perfect for creating steam, cigarette smoke, or mystical fog effects. These brushes usually feature wispy, translucent qualities that blend beautifully when you adjust opacity and flow settings.
Abstract Cloud Brushes provide stylized, artistic interpretations of atmospheric elements. They’re fantastic for conceptual work, digital art, and projects where you want a more painterly or illustrative feel rather than photorealism.
Volumetric Fog Brushes create those dreamy, ground-level mist effects you see in forest photography or moody urban scenes. They’re essential for adding depth and atmosphere to landscape work.
Furthermore, Particle and Dust Brushes technically fall into this category too. While not strictly clouds or smoke, they create atmospheric particles that catch light and add that magical quality to your scenes.
Frequently Asked Questions About Smoke & Cloud Photoshop Brushes
Let me address the questions I get asked most often about working with atmospheric brushes.
Q: Do smoke and cloud brushes work with all versions of Photoshop?
Absolutely! Most brush sets are compatible with Photoshop CS6 and newer, including all Creative Cloud versions. However, always check the product description before purchasing. Some advanced brushes that use newer features like blend modes or pressure sensitivity might require CC versions for full functionality.
Q: Can beginners use these brushes effectively, or do you need advanced skills?
Great news – these brushes are incredibly beginner-friendly! In fact, that’s one of their biggest advantages. While understanding layer masks, blend modes, and opacity controls will help you maximize their potential, you can create stunning effects right away with basic knowledge. Many designers actually learn advanced Photoshop techniques specifically because these brushes inspire them to experiment.
Q: What’s the difference between free and premium smoke brushes?
Free brushes are fantastic for learning and experimentation, but they often have limitations. Premium brushes typically offer higher resolution (important for print work), greater variety, more natural variations, and commercial licensing. If you’re working on client projects or planning to sell your designs, premium brushes with proper licensing are essential. The investment usually pays for itself after just one or two projects.
Q: How do I install smoke and cloud brushes in Photoshop?
Installing brushes is super straightforward. Simply download the .ABR file, open Photoshop, select the Brush Tool (B), click the brush picker in the top toolbar, click the settings icon, choose “Import Brushes,” and navigate to your downloaded file. Boom – your new brushes appear in your library! For CC 2021 and later, you can also just drag and drop the .ABR file directly into Photoshop.
Q: Can I adjust the color of smoke and cloud brushes?
Definitely! That’s one of their best features. You can change brush colors just like any other brush – simply select your desired foreground color before painting. For more complex color effects, try painting on a new layer and using blend modes like Overlay, Soft Light, or Color Dodge. This technique creates incredibly realistic atmospheric effects with custom color schemes.
Q: What resolution should I look for in quality cloud brushes?
For professional work, aim for brushes that are at least 2500 pixels at their largest dimension. If you’re working on high-resolution projects or prints, go for 4000-5000 pixel brushes. Smaller brushes (1000-1500 pixels) work fine for web graphics and social media, but they’ll pixelate if you scale them up significantly.
Q: How do I make smoke and clouds look realistic in my compositions?
Realism comes from layering and subtlety. Never rely on a single brush stroke – build up your effect with multiple layers at varying opacities. Pay attention to your light source and adjust brightness accordingly. Use layer masks to blend edges seamlessly. Moreover, study real smoke and cloud references to understand how they interact with light and their environment. The key is restraint – less is often more when creating believable atmospheric effects.
Top Techniques for Maximizing Your Smoke & Cloud Brushes
Now let’s talk about how to actually use these brushes like a pro.
Layering for Depth: The secret to professional-looking atmospheric effects is building them up gradually. Start with a low opacity (20-30%), paint your initial effect, create a new layer, and add another pass at a slightly different angle or opacity. This creates natural depth and variation that single-stroke applications can’t achieve. Think of it like watercolor painting – you’re building up transparent layers.
Mastering Blend Modes: This is where the magic happens! Experiment with Screen mode for bright, glowing effects; Multiply for darker, moodier atmospheres; and Overlay for subtle color shifts that interact with your underlying image. Soft Light is particularly effective for creating that dreamy, ethereal quality without overpowering your composition.
Using Layer Masks: Don’t paint directly on your image layer – always work on separate layers with masks. This non-destructive approach lets you refine your effects endlessly. Paint black on your mask to hide areas, white to reveal them, and gray for semi-transparent effects. This technique gives you ultimate control over how your atmospheric elements blend into your scene.
Adjusting Brush Settings: Don’t just use brushes straight out of the box! Experiment with Flow and Opacity settings in your brush toolbar. Lower flow (30-50%) creates softer, more gradual buildups. Adjust spacing in your brush settings to control how densely or sparsely your brush strokes appear. If you’re using a pressure-sensitive tablet, enable pressure sensitivity for size and opacity – this creates more natural, varied effects.
Color Grading Your Effects: After applying your smoke or cloud effects, use adjustment layers (Curves, Color Balance, or Hue/Saturation) to color-grade them so they match your scene’s lighting and mood. This step separates amateur work from professional results. Your atmospheric effects should feel integrated into the scene, not pasted on top.
Essential Features to Look for in Premium Brush Sets
When you’re investing in premium brushes, certain features separate okay sets from exceptional ones.
Variety and Range: Top-quality sets include 50+ unique brushes with different shapes, densities, and characteristics. This variety ensures you won’t use the same three brushes in every project, which keeps your work from looking repetitive.
High-Resolution Files: As mentioned earlier, professional brushes should be at least 2500 pixels, ideally 4000+. This resolution ensures crisp results even in large-format work.
Natural Variations: The best brushes include subtle variations within each brush tip. This prevents that obvious “stamp” look that screams “I used a brush!” Natural randomness creates more organic, believable effects.
Pressure Sensitivity Support: If you use a drawing tablet (which I highly recommend), pressure-sensitive brushes that respond to pen pressure create far more dynamic, artistic results.
Commercial Licensing: For professional designers, clear commercial licensing is non-negotiable. You need legal permission to use these brushes in client work and commercial projects.
Documentation and Tutorials: Premium sets often include guides showing you how to use each brush effectively. This educational component can dramatically accelerate your learning curve.
Real-World Applications: Where These Brushes Shine
Let’s explore practical scenarios where smoke and cloud brushes become absolute game-changers.
Portrait Enhancement: Adding subtle fog or haze around portraits creates depth and draws attention to your subject. Fashion photographers frequently use these effects to create that coveted editorial look. A soft cloud brush at 15-20% opacity can transform a standard portrait into something magazine-worthy.
Landscape Photography: Composite artists use cloud brushes to replace boring skies with dramatic formations. You can turn a mediocre sunset into a breathtaking spectacle or add ominous storm clouds to create mood and tension. Similarly, fog brushes help create depth in landscape scenes, separating foreground, midground, and background elements.
Product Photography: Smoke effects add luxury and intrigue to product shots, particularly for perfumes, beverages, or premium goods. That mysterious vapor rising from a coffee cup or perfume bottle? That’s usually a smoke brush at work, not actual steam captured in-camera.
Movie Posters and Entertainment Design: The entertainment industry relies heavily on atmospheric brushes to create those epic, larger-than-life poster designs. Mysterious fog, dramatic clouds, and ethereal smoke effects are staples of this genre.
Fantasy and Sci-Fi Art: Digital artists creating otherworldly scenes use these brushes to build alien atmospheres, magical effects, and supernatural environments. The ability to quickly lay down convincing atmospheric elements is crucial when building entirely imagined worlds.
Social Media Graphics: In the attention economy of Instagram and Pinterest, atmospheric effects make your graphics stand out. Posts with depth and visual interest receive 2.3 times more engagement than flat designs, according to recent social media analytics.
Common Mistakes to Avoid When Using Atmospheric Brushes
Even experienced designers sometimes fall into these traps – here’s how to avoid them.
Over-Application: The biggest newbie mistake is going too heavy too fast. Atmospheric effects should enhance your design, not overwhelm it. Start subtle and build up gradually. You can always add more, but removing excess while maintaining a natural look is much harder.
Ignoring Light Direction: Smoke and clouds react to light sources. If your scene has sunlight coming from the right, your clouds should be brighter on the right side too. Failing to match light direction makes effects look pasted on and fake.
Using the Same Brush Repeatedly: Variety creates realism. Using one or two favorite brushes in every project creates a signature look – and not in a good way. Rotate through different brushes and combine multiple types for more organic results.
Forgetting About Perspective: Clouds and fog follow perspective rules just like everything else. Distant atmospheric elements should appear smaller, lighter, and less detailed than foreground effects. Many designers paint all their effects at the same scale, destroying the illusion of depth.
Skipping the Refinement Stage: Your first pass is never your final result. Professional work requires refinement – adjusting masks, tweaking colors, and fine-tuning blend modes. Budget time for this crucial finishing stage.
Optimizing Your Workflow: Speed Tips for Professionals
Time is money in the design world. Here’s how to work faster without sacrificing quality.
Create Custom Brush Presets: Once you find settings that work well for specific effects, save them as presets. This eliminates repetitive adjustments and maintains consistency across projects.
Use Actions for Repetitive Effects: If you frequently use the same multi-step process (like creating fog with specific layers and blend modes), record it as a Photoshop Action. This automation can cut your workflow time dramatically.
Organize Brushes into Folders: Don’t let your brush library become chaotic. Create folders for different brush types – clouds, smoke, fog, particles. This organization saves you from scrolling through hundreds of brushes hunting for the right one.
Keep a Swipe File: Screenshot or bookmark designs with atmospheric effects you admire. This reference library provides instant inspiration and technical guidance when you’re starting a new project.
Invest in a Graphics Tablet: If you’re serious about atmospheric effects, a pressure-sensitive tablet (even an entry-level one) dramatically improves your control and results. The ability to vary opacity and size with pen pressure creates far more natural-looking effects.
The Future of Atmospheric Design Tools
The design world is evolving rapidly, and atmospheric effects are evolving with it.
AI-assisted brush tools are emerging that analyze your scene and suggest realistic atmospheric placements. While these tools are still developing, they’re becoming increasingly sophisticated. However, the human eye and artistic judgment remain essential – AI can assist, but it can’t replace creative vision.
3D atmospheric effects integrated with Photoshop’s 3D capabilities are opening new possibilities for designers who work in mixed 2D/3D workflows. These tools allow you to position fog and clouds in actual 3D space, creating more believable depth and interaction with 3D elements.
Real-time rendering improvements mean we’re seeing faster previews and smoother workflows when working with complex atmospheric layers. What used to require a coffee break for rendering now happens almost instantaneously on modern systems.
Conclusion
Beautiful smoke and cloud Photoshop brushes aren’t just nice-to-have tools – they’re essential weapons in the modern designer’s arsenal. They transform ordinary visuals into atmospheric experiences that capture attention, evoke emotion, and leave lasting impressions on viewers.
Throughout this guide, we’ve explored everything from choosing the right brush types to mastering advanced techniques that separate amateur work from professional results. Remember, the key to success with atmospheric brushes lies in subtlety, layering, and understanding how light and atmosphere work in the real world.
Start with quality brushes that offer high resolution and variety. Experiment fearlessly with different blend modes, opacities, and layering techniques. Study real atmospheric references to train your eye. Most importantly, practice consistently – these skills compound over time.
Whether you’re enhancing portraits, creating fantasy landscapes, designing movie posters, or elevating your social media graphics, atmospheric brushes give you the power to create stunning visuals that were once achievable only by the most skilled digital painters.
Don’t let another project go by with flat, lifeless compositions. Grab a quality smoke and cloud brush set, fire up Photoshop, and start adding that professional atmospheric magic to your work today. Your designs – and your clients – will thank you for it.